Saturday, April 30, 2022

Hands 2 Help - A Simple Scrappy Quilt Tutorial

Hi all! And welcome to Crazy by Design! Mari, who is hosting the Hands2Help quilt drive this year, asked me if I’d be willing to share an easy quilt tutorial with you. By now most of us quilters are probably familiar Hands 2 Help, with the long-running annual drive in the US and Canada to collect quilts for worthy children’s (and other) charities. More about this wonderful quilt drive can be found HERE.

In the past eleven years, H2H has been hosted by Sarah of Confessions of a Fabric Addict. However, due to personal health reasons, she was not able to host it this year, so my friend Mari of Academic Quilter stepped up to the plate. This is the twelfth year of quilters coming together!

Today I’m going to share with you a simple quilt that is used in Quilts for Kids chapters throughout the United States. You can visit the national QFK website or our local (Salt Lake) chapter website to get the pattern.  OR you can just read along here instead if you like, because I’ll show you AND give you lots of alternative ideas to use up those scraps and whip out a cute kid quilt in no time!

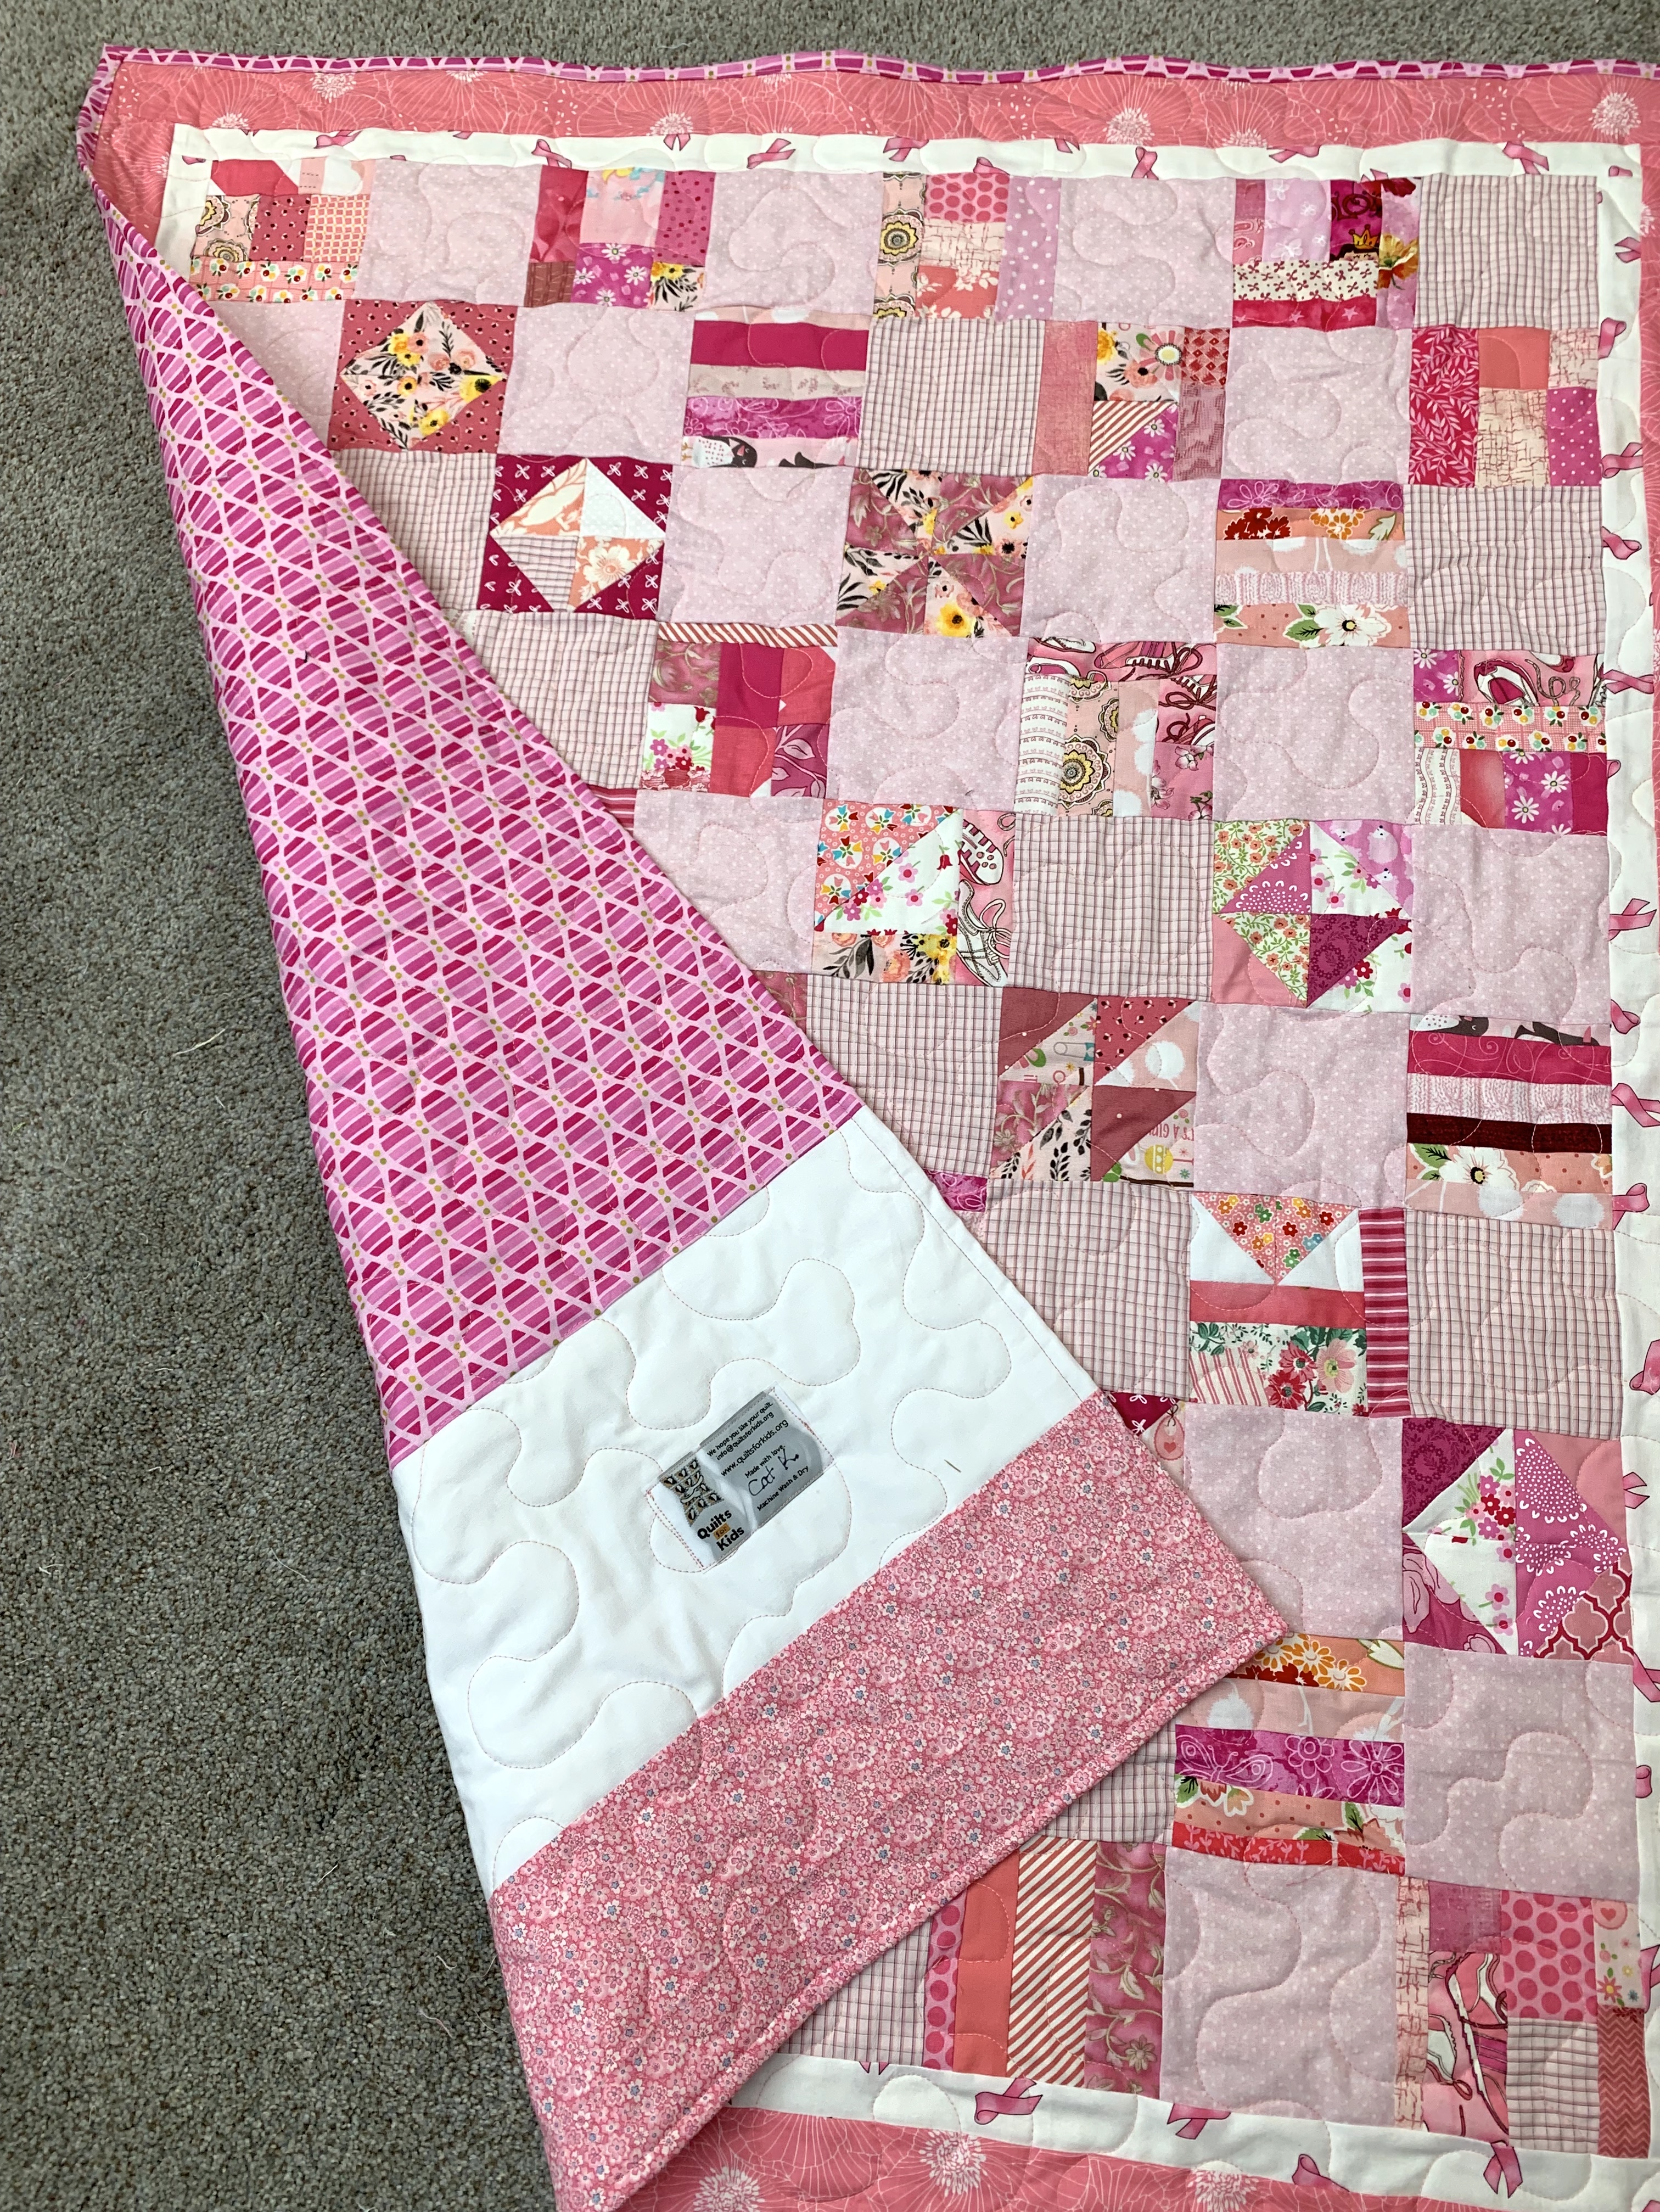
First, let me show you what the finished quilt looks like (my variation):


Those who are familiar with my blog know that I love string blocks, and since I always have lots of those on hand, I decided to use 15 of them in this quilt. All the blocks are cut at 6.5” and finish at 6” in the quilt. Now, string blocks may not be your thing, as they are time consuming. So let’s back up and insert some other alternatives for those contrast string blocks.

This is the same quilt pattern, sewn with two alternating fabric squares; 15 of the blue print fabric and 15 of the white print.

Or you could mix blocks; plain and nine-patch, plain and crumb blocks, plain and four-patch blocks. 

Here’s a quilt with several colors of string blocks that match the main fabric.

Or find a fun 1-yard cut of fabric in your stash that has lots of contrast color possibilities, like the bright cat on black fabric shown below.

*****************************

So, let’s get to the basics of the pattern. This is the fabric you will need:

1 yard main (feature) fabric                                                                                                                                                             15 blocks @ 6.5” unfinished OR 5/8 yard of alternating fabric                                                                                                         ¼ yard (NOT a fat quarter) of contrast fabric for inner stop border

Cutting:

Cut your main fabric into three WOF (width of fabric) strips measuring 6.5” wide.  Subcut those strips into 15 blocks measuring 6.5” square. There will be leftovers.

From the remaining main fabric, cut four WOF strips at 3.5” wide. 

From your alternate 5/8 yd piece, cut three WOF strips at 6.5” and subcut into 15 blocks at 6.5” OR use 15 blocks (crumb, four- or nine-patch, or string blocks) at 6.5”. If you have some ready-made blocks in your stash, this is a real time saver!

From the contrast fabric, cut four WOF strips at 1.5”

Top L-R: 15 Main fabric squares, 15 string blocks, Four 3.5" WOF strips
Bottom: Four 1.5” WOF contrast strips

Sew your 6.5” blocks together in alternating fashion, five blocks across by six blocks down. At this point it should measure approximately 30.5 by 36.5”. 


Add your 1.5” contrast strips first to the sides, then to the top, trimming to fit. Add the final main fabric 3.5” borders to the sides and top and trim. That’s it! Just add your backing, quilt and bind.

Another time- and fabric-saving tip that we use in many of our Quilts for Kids quilts is the fold-over binding. The best tutorial I’ve found for this easy and quick method is here at Cluck Cluck Sew.  And do remember that most, if not all charities prefer a machine-sewn binding. Charity quilts are often subjected to frequent launderings.


Quilted, bound, labeled and ready to go!


I hope you enjoyed this little tutorial! Please let me know if you have any questions! 

Wrapping Up Pink April

I got my final pink blocks quilts done just under the wire - yesterday. There are three quilts, but you’ll  only see two of them today because one will be introduced tomorrow for a Hands2Help guest blog post.  More on that later in the post.

First I sewed up the Bear Paw blocks that I wanted to get done for the month. There are two at 6.5” and five at 3.5”. 

I also sewed up more string blocks - another 30.  These will go to Quilts for Kids for use in kits. And that is another hint about my blog post for tomorrow; I’ll be showing the “kit”, pattern and finished quilt that used some of my original string blocks made earlier this month. Plus ideas and variations.


With those out of the way, I could concentrate on finishing up the pink scrap quilts I had planned for the month. Last week I showed this pile of potential:


Well, after some fun playing on the design board with the various pieces, this is the result:


My only regret is not using a brighter pink fabric to pair with the selvage half hexies. But I wanted to use scraps instead of cutting into yardage. And I used every bit of that pink and white stripe  except a couple small crumbs that will get used up next year. 


All the pink selvages are used, and most of everything else you see in the quilt is gone other than a few crumbs or small squares. I quilted it, as usual, with a simple stipple. The quilt finished at 38x46”.

I broke down and decided to use some of that wonderful Tula Pink background for the backing/binding. I’d buy a bolt of that stuff if I could find it! 

I thought I’d shown a picture of the following little quilt in process somewhere along the line this month, but I sure can’t find it. Oh well, it’s finished now. For some reason I thought the “kit” I’d assembled last year had more pink in it, but it’s really more green and lavender. But whatever - as long as it gets finished and passed on to Quilts for Kids, it’s all good.

The plaid cheater fabric in the center panel as well as the lavender squares have been sitting around since last year. Back in October I got some of the pastel plaid scraps and the owl print, and that was enough to go to the stash to pull green scraps and those dang pink selvage squares. 


Somehow, it works. Again, it’s quilted in a stipple, which I always like to do when there are selvages involved so I can backtrack over areas that may need to be tamed. 


This little pastel baby quilt finished at 36.5x42”. It’s very soft and cuddly. The backing also used up a lot of fabric chunks, although I think I have a few skinny strips of the black and white giraffes left. 


So, that wraps up Pink April! Be sure to visit Scrappy Saturday at Angela’s blog to see all the scrappy pink goodness before Angela calls the new color for May! 

We’re still in rainy weather mode here, so our garden is not yet planted. The drip irrigation is all ready to go, but we had “frozen mix” in the weather forecast for yesterday (didn’t happen), so we’ve put off planting until the 10-day forecast shows no more freezing temps. It will happen (I keep telling myself.....)


Be sure to drop by here or at Mari’s blog tomorrow for my guest post for Hands2Help. And have a wonderful week!


Saturday, April 23, 2022

Three Little Pink Quilts

This week my focus in the studio was to finish some of the pink quilt tops that I’ve been sewing up from scraps this month. Pink is April’s color for the Rainbow Scrap Challenge, and I like to make as many pink quilts as possible whenever this color comes up so that I don’t have to mix it in with the other ROYGBIV (standard rainbow) colors. 

But first I did sew some cute little 4” bow tie blocks using some of my 2.5” squares. 

Then in one afternoon I went on a basting frenzy and sandwiched up three little quilts to be quilted. There was only one day this week where the weather allowed us to work outdoors due to rain, so it was no problem to quilt, bind and label them for our QFK workshop today.

This first one was made from various leftover width-of-fabric strips that I had  collected over the last couple years and kitted up for a pink sewing month. It measures 37xx44”.


The backing was this awesome 100%. Cotton sheet (well, half of it). I love plaids!!

Next up was another WOF strip-and-chunk quilt of fabrics gathered and kitted last year.

I was so excited at how well this recent online fabric purchase for the backing matched the quilt front. The quilt finished at 39.5x46”.


The third quilt used a lot of crumbs, leftover half-square triangles and pink fabric squares. 


It finished at 40x48”.


I still have another pink-and-color-friends quilt to quilt, and one pile of scraps and selvage half hexies to assemble into a quilt. That will be a fun project for Sunday.


In between the above quilts and blocks, I devoted some sewing time to my new Zipper Quilt. There were only four blocks left to sew, then it was quick work to assemble the 54x63” top. 


I prepped the backing - a lovely floral on navy background fabric thatI purchased at Missouri Star Quilt Company last summer. Now it’s all on a hanger, waiting to be quilted next month. 

We interrupt this blog post to bring you a word from our sponsor, Alfalfa. He’s here to remind you that if you do not have a furry quilting supervisor, then you are not doing it right!


That is all. Carry on.

And as you can see in the picture behind Alfie, he insisted that I make some progress on my Hearts for Ukraine quilt (he’s a slave driver I tell you!). I found an old blue and yellow floral jelly roll that I’m going to use to finish up the top. 


So I added a stop border and am in the process of sewing and adding the checked border. It’s just slapped up on the board for now, not sewn.


The final border will be a piano key border on the top and bottom in these fabrics to make it rectangular. It should finish about 54x66”. Unless Alfie or I change our minds. 

If you’re interested, I did a post mid-week that shows all the recent renovations we did in March. You can visit by clicking the “older post” link below or visiting here

This week Bruce and I finally bought a new bed. It will be delivered in mid-May. That gives us time to shop for sheets and rugs. I also bought plane tickets for my son Ryan I to fly up to Seattle next month to visit and help out my daughter Megan, who is having (female) surgery. More about that trip later. Between all that and the recent remodeling, I feel as though our money has grown wings. But I am grateful we have it to spend. With the state of things in the world, I know we are very blessed. Life is good.

Wednesday, April 20, 2022

Renovation Reveals

It’s finally time to show some before and after pictures of our recent (last month) chaos remodeling and renovation projects. I will readily admit that these are likely to be far more exciting to me than they are to you, so just gird your loins and prepare to be underwhelmed. Or not. Your choice. 

So a little bit of back story first. Our home was built in 1963 and although we are technically the third owners, we are only the second family to live here. We’ve been here a few months short of 20 years. 

The original laundry room has remained untouched with the exception of an upgraded floor drain in 2008 and the addition of a tile floor the following year. The wall behind the washer and dryer had big cut-out holes for (presumably) different pipes and vents and clean-outs and whatnot over the years. The cats could’ve gotten through to the unfinished, drafty under-the-house section there had they tried, which to our knowledge they never did. Or if they did, they’re not talking….

So, let’s begin.

Laundry Room Before:


Laundry Room After: 


I took a long time to decide on the color, vacillating between aquas and blues. In the end I went with a light blue, which I’m thrilled with. It feels so fresh and clean. These photos make it look a bit paler than it is, but it is neither subtle nor overwhelming.

We added a low shelf that I can actually reach to wipe down, as well as an upper cabinet for laundry supply storage. The lower cabinet houses a laundry basket and is taller so that I have lots of horizontal space for sorting and folding. 


It was so fun to have room to add a few laundry and beach-themed decorations.


And this clean solution to the former mess behind the machines just makes my heart so happy. I feel as though this room, the last one to be touched by renovation in this house, is finally part of the current century!


***************************

The Linen Closet

Our hall is a central hall off of which opens three bedrooms, one bathroom and three hall closets. The three closets were all tiny: a standard coat closet which we’ve always used as a cleaning closet with space for brooms, mops and shelves of cleaning products, light bulbs, etc. The second closet also has a hanging rack which we use for off-season outerwear. It was expanded in 2009 a couple feet outwards to allow room to store our vacuum and carpet cleaner. That post is here.

The linen closet had shelves that were a mere 11.5” wide. That’s a hard pill to swallow for any modern homeowner, but especially so for a quilter. Ever since we ripped out the hall carpeting and restored the hardwood floors in our 2017 living room remodel, the linen closet doors could barely hang properly because of bulging contents inside! 

Before:


During:


After:


Room for quilts and all the things!


An extra five or six inches in shelf width makes an enormous difference. It was not a cheap solution, but again, brings the home into the current century.

So that’s the completed projects in a nutshell. Today we finally bought a new split adjustable bed that will be delivered in mid-May. That will give me time to shop for sheets and things. It also has me thinking that perhaps this year is the time to start a bucket-list quilt for this bed: a Storm at Sea and Snail’s Trail hybrid king size quilt. It will likely be a slow, long-term project.  I’ve decided that when we have our Utah Shop hop this year, I’ll be on the hunt for just the right batiks in blues, purples and aquas.  I’m not getting any younger.


Saturday, April 16, 2022

(Elephant) Trunk Show!

The elephants are having a Trunk Show, and you’re invited!! Try to contain your excitement, LOL!!

Our hosts for this exciting event are the Pink Elephants, who are proudly sponsored by Pink April for the Rainbow Scrap Challenge. Let’s meet them first…


Three of them you met last week, but they’ve been joined by four other friends who were, um, shall we say browsing in the bush?!? It is what elephants do. And now they’ll join their other multicolored friends on the design board for a good ol’ elephant trunk show!


Oh my goodness, they are so cute I can’t even stand it! Other than one red elephant I gave to my friend Ruby (who is also making some for a quilt for her sister), these are all the elephants I’ve made since my first two (green) prototypes last fall. Or summer. Whatever. The pattern is Stomping Ground by Wendy Sheppard.

So how many will I be making? I don’t know, but there will be several dozen more over the next six or eight months, I’m sure. They will be arranged and spaced out by colors into kid quilts using fun fabrics to tie the selected colors together. I want lots of options and combos. Here are a few fabric possibilities from my stash.


I’ve pretty much decided against the brown one at the bottom, and my favorite is the gray at the top with magenta, aqua, orange and lime dots. (And wouldn’t that make cute elephants?) But I have plenty time to decide. Plus we’ll actually be having our Utah Shop Hop again this year, so I’ve got an opportunity to pick up some fun mixer prints and (hopefully) some cute elephant backings. So be watching for more “trunk shows” later in the year!

Before I continue with my weekly pink blocks, I want to show you the hardwood floor we uncovered in the master bedroom. The previous owners had carpeted over it in the early nineties. We know it was them because we’re only the second family to live in this home built in 1963. Unfortunately, they repainted the bedroom white at the time and didn’t use drop cloths. Some of the paint splattered on the floor. Luckily, some of it was covered by the new wider and thicker baseboards, but our contractor Jeff and Bruce himself did a lot of scraping. Other than just a little cleaning, oiling and filling some carpet tack holes, there was nothing else necessary.


Yes, the bedroom is small, but it will fit a California King, and we have been shopping for a split adjustable bed. 


I have lots more from the remodeling projects (laundry room, linen closet) to share, but I’m going to do those in a separate post mid-week. Next year’s project will include all new six-panel interior doors. There’s always something more to do, isn’t there?

So, back to pink. This week I got in lots of quality sewing time thanks to spring showers and inclement weather.

Twelve Bullseye Log Cabin blocks

Thirty 6.5” string blocks

And two finishes for Quilts for Kids.  This first one I’m calling Ukrainian Cats simply because of the yellow and blue. The combination of yellow, blue and black scraps and selvage blocks was inspired by the backing fabric, a gift from my friend Sally


You may recall that I used this same fabric in a different color way for a backing in one of my January quilts. Thanks, Sally! These backings have been both fun and inspirational. 


Ukraine Cats finished at approximately 38x48”

I also got last week’s framed four-patch block flimsy quilted and bound. I would rather do little donation quilts in just pinks than to “taint” a gender-neutral rainbow quilt with them if I can. (Because - macho dads). I do mix in pink on larger RSC quilts now and then, or if I’m keeping it for gifting. Most of the men I know don’t have a problem with it!


This cutie quilt finished at 40x48”


I’ve got two more pink flimsies waiting for quilting, one flimsy being sewn together this weekend, and two more pink “kits” of gathered pink scraps to assemble into something resembling cohesive quilts!

And I think that just about covers it for now. Be sure to visit Scrappy Saturday to see all the creative quilty goodness that’s been sewn up this week.